|

Now through August 12th!
|

|
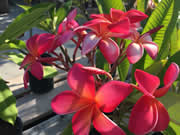
No matter where you live, you can grow the lovely tropical mandevilla. With its glossy green leaves and large, velvety blooms, it is at home in almost any garden setting.
There are hardy typyes that will be fine outdoors in our area (but may need frost protection).
The plant was named after Henry Mandeville, a British diplomat who was also an avid gardener. While there are several species of Mandevilla, the two most often found in garden centers are mandevilla hybrids and Mandevilla splendens. Mandevilla hybrids tend to be more vining; be sure to provide a trellis or other support for this type.
Mandevilla splendens (formerly called Dipladenia splendens or Mandevilla sanderi) tends to be bushier - although it, too, can eventually reach a height of 15'-20' with support. To encourage bushier growth (the vining type, especially, can tend to be a little rangy), pinch back the new growth.
Mandevillas are available in red, white and many shades of pink. Most varieties have golden-yellow throats.
Depending on the climate, the mandevilla can be grown in full sun to part shade. In areas with intense summer heat, partial shade is best.
Mandevillas can be prone to mealybugs, scale, red spider mites and whiteflies, so be sure to inspect your plants often in order to derail these pests before they can cause major damage.
If you notice these pests or their damage on your plant, visit us so we can advise you about the best way to treat them.
Mandevillas prefer a rich soil, so be sure to amend your soil with GBO Planting Mix when planting in the ground. When growing the Mandevilla in a container, use a quality potting soil.
During the growing season, be sure to fertilize regularly with Gro-Power Flower 'n' Bloom to encourage lush new growth and bountiful flowers.
Click to print this article.
|
 |
|
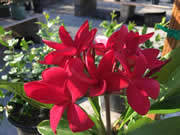
For most pool owners, the landscaping surrounding it can be the finishing touch to the backyard oasis. Plants provide beauty and privacy around a swimming pool.
They also can be used to hide swimming pool equipment and help swimming pools to blend more naturally with the surrounding environment.
Your goal should be to create a landscape that frames your pool and makes it the focal point of your yard. Make sure to incorporate some taller plants that will be able to form privacy screens around the pool area. And don't forget to select plants that will be low maintenance and use less water. This will give you more time to enjoy your pool.
Every pool owner should be aware of a number of considerations before selecting plants. Remember that your pool and the deck surrounding it reflect a tremendous amount of sun. Make sure to choose plants that can take it. Also, pick plants that either don't cause much litter or that drop all their leaves at one time so you only have to clean up once a year. Constant leaf drop will require constant cleaning.
Use low water-use plants that will not require heavy irrigation around the pool. Too much water can damage pool equipment and potentially lift your concrete decking. Plan for year-round color and select plants with showy flowers that don't attract bees.
Try to avoid planting lawns near swimming pools. This will help keep grass clippings out of the water. If planting trees, select varieties with non-invasive root systems to avoid damage to deck or pool.
It's hard to avoid splashing around a pool, so any nearby plants will probably be exposed to the effects of pool chemicals. How your plants are affected will depend upon the type of chemicals you use. As a general rule, plants with thick leaves are more likely to be resistant to chemicals and pool salts.
As always, if your soil is poor, amend with one of our GBO soils before planting, and use a good-quality potting soil if you are planting in pots.
A poolside landscape will enhance the beauty and elegance of your pool. By softening the edges of your pool, you can make it blend in more naturally with the rest of the garden.
We have a great selection of plants that are perfect for poolside planting. Stop by and our staff of nursery professionals will be happy to help get you started.
Click to print this article.
|
 |
|
If you have a pool, you may wonder why there are so many bees in it.
Often you'll scoop up a half-dozen casualties when you're skimming the pool, and they tend to land on everyone--especially those wearing bright colors.
Swimming pools are like big beacons for bees. They see them and they think "Water! Yes!" Swimming pools are a dependable water source for suburban animals. In many places a pool will be the only body of water inside their entire territory.
They tell their friends and then they all know that your pool is the place to drink up.
The problem is, you don't really want them there, and it's not a safe place for them, either. Bees have to dry out before they can fly, and the vertical and slippery walls on your pool make this impossible for them, so they will drown. They can also drown in your nice, deep birdbath.
A good way to help out your local pollinators and to keep your pool safer is to create a place for them to get water safely, away from your pool.
All you'll need is a basin of some sort, wide and shallow works best, some clean water, and something to put in it for the bees to climb onto to dry off.
A ceramic or clay pot base works well, but you could also use a bird bath, a bowl, or even a deep dish for the basin. Marbles, glass beads, fish gravel, rocks or wood can be used on the inside. A water-absorbing rock, like pumice or sandstone, works well--they can land and drink out of the rock. Even a loofah will work (but make sure you don't use one with soap added)!
The important thing is that there is something to hold water and a way for them to get out of the water. Arranging your filler at various heights in the basin will allow for bees to get water whether it's all the way full or mostly empty.
As with a bird bath, you will have to clean and refill periodically.
Choosing a nice decorative basin and mixing and matching different sizes and colors of substrate will create a unique-looking and fully-functional bee bath. And don't be surprised if you attract a few butterflies as well!
Click to print this article.
|

|
By: Tamara Galbraith
Summer's in full swing, and your previously glorious flowers are starting to look a little ragged around the edges.
Many plants will benefit--and even rebloom--after a mid-summer session of "deadheading," that is, removing spent flowers and/or stems to promote new growth.
Here's a quick guide of deadheading techniques for different types of flowers:
Pinch off individual dead flowers on balloon flower, bellflower, daylily, delphinium, foxglove, hibiscus, hollyhock. (Also included: some irises that will rebloom in the fall, depending on the variety.)
Do an overall snip of dead blooms (about 2" below the flower) on blanketflower, columbine, globe thistle, goldenrod, geranium, Jacob's ladder, salvia, coreopsis/tickseed.
Cut off the entire spent flower stem to either a side shoot or to the plant's base on baby's breath, bleeding heart, cardinal flower, catmint, coral bells, foamflower, gaura, Jupiter's beard, lavender, lupine, mullein, painted daisy, pincushion flower, coneflower, Shasta daisy, speedwell, spiderwort, Stoke's aster.
(Listening to The Grateful Dead while deadheading is, of course, optional.)
Click to print this article.
|
|
|


Whittier Weather

Contact Information:
Telephone:
(562) 947-2013
Address:
16440 E. Whittier Blvd.
Whittier, CA 90603
Hours:
Open 7 days a week, 8:30 am-5:00 pm
|
|
|